heade

Arc welding Safety Procedures and Preventive measures

Arc-welding  is a safe occupation when sufficient  measures  are  taken  to protect the welder from  potential  hazards. When these measures are overlooked ,   however, welders can  encounter such dangers as electric  shock, over exposure to  fumes  and  gases, arc radiation,  and  fire  and  explosion; which  may result  in  serious, or   even fatal injuries.

Image result for arc weldingsafety

Even  though  the  output voltage  of a manual electric
                  arc welding transformer (welding transformer) at open
                  circuit  no-load  condition  is not very high, only about
                  60  to 80 Volt a.c. It could cause electric shock .


               2. The  Electric shock may cause injuries  to the welding
                   workers and sometimes leads to death.          

The followings are the common causes of electric shock 

         1.Overlook the potential hazards in the working environment


           2.Carelessness during welding


           3.Use of unsafe welding equipment.

Enhanced Welding Safety to Prevent Electric Shock

        In order to prevent electric shock and to minimize the damage or injury , We should follow 
        the following:
               1. To  avoid  direct contact with the live  parts  of  welding  equipment 

                    and the workpiece to prevent electric shock. 

               2. To make the overall impedance of the leakage current path is large


  1. Do Not weld in open source during raining.
  2. Do not stay in water or seriously flooded workplace to weld.

Safe Working Practices


             Avoid  making  direct  contact with any exposed conductor of the electrode
                holder, the  connected welding electrode and the exposed metal part of the
                workpiece with the bare hands or the body. 

             Always keep the hands and the body dry. 

             Do not put the welding transformer too far away from the workplace.In case
                of  need or  accident,the welding transformer can be switched off in time to
                disconnect the power source. 

             Switch off  the welding transformer when it stops welding to take breaks for 
                 rest,tea and meal.Also properly dispose of the welding rod remained on the
                 electrode holder.
Image result for arc weldingsafety
Use of Safety Welding Equipment


              o Properly  earth the metal casing of welding transformer by 
                   connecting separate earth wire to the power source.  

                o Install  an  automatic   voltage   regulator   in   the  welding
                   transformer  to  reduce the open circuit no-load voltage of
                   the transformer and the risk of electric shock. 

                o Use proper cable connectors to extend the welding cables.

                o Use proper and safe welding equipment

USE PPE
        1. Wear  dry  welding   gloves.


        2.Wear good insulating shoes
            and boots.


        3.Wear   protective   clothing. 
            Avoid naked body.

How to handle occupational injury at workplace

According to the Bureau of Labor Statistics, musculoskeletal disorders accounted for 33 percent of all workplace injuries and illnesses requiring days away from work in 2011. Additionally, BLS notes that for all occupations, the back was injured in 42 percent of reported MSD cases and required a median of seven days to recuperate.
Image result for occupational injury
The first step to preventing back injuries is to get in good physical shape and maintain it, the Washington-based Laborers’ Health and Safety Fund of North America notes. Being overweight, especially when most of the excessive weight is carried in the abdomen, creates tremendous stress on the back. The organization also advises the following:
  • Become educated about avoiding back injuries on the job.
  • Stretch before work. A slightly elevated heart rate gets blood flowing to the muscles as well as to the discs between the vertebrae in the spine.
  • Maintain good posture.
  • When facing a specific task, always assess the load and decide if it can be handled by one person. Check for obstacles in the path. Set the task up to be as easy as possible.
  • Note that back belts do not prevent back injuries and can provide a false sense of security.
  • Keep in mind that some tasks can be done safer with mechanical equipment such as lifts or other lifting equipment.
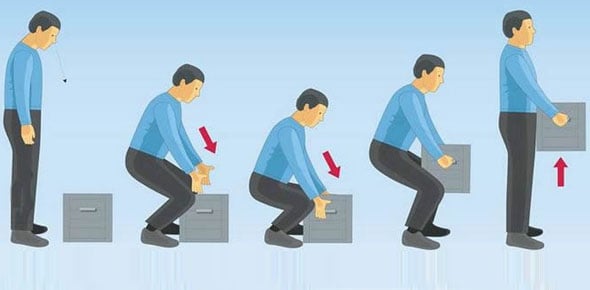
  • When lifting, bend the knees and get as close to the load as possible. Keep the back straight and use the legs to do the heavy work. Avoid twisting when lifting, carrying or lowering the load. When carrying, keep the load as close to the body as possible. When finished, take a few seconds to straighten and stretch the back.

How to do Manualy Safe lifting

Lifting and carrying objects is common for many workers across the country. But training is important. If performed improperly, lifting and carrying items can lead to injuries. The National Safety Council notes that manual handling of objects accounts for an estimated 25 percent of all occupational injuries. Common materials-handling injuries include strains and sprains (specifically to the back), cuts, fractures, and bruises.
Image result for manual lifting

NSC states that no “sure-fire” rules exist for safe lifting: “Manual materials handling is a very complex combination of moving body segments, changing joint angles, tightening muscles and loading the spinal column.” However, NSC does recommend following a number of do’s and don’ts pertaining to lifting.
Do:
  • Eliminate manual lifting whenever possible to help reduce injuries.
  • Stay in good physical shape if lifting items is part of your job.
  • Keep materials within easy reach and have handling aids around in case you need them.
  • Make sure you have a good grip on any item you attempt to lift. Test the weight and balance of items before moving them. Too heavy? Get a mechanical lifting aid or ask a co-worker for assistance.
  • Keep the item you are lifting close to your body. Ensure your feet are close to the load, stand in a stable position with your feet pointed in the direction you’re moving, and lift mostly by straightening your legs.
Don’t:
  • Twist your back or bend in a sideways direction.
  • Attempt to lift or lower an object if you’re in an awkward position.
  • Feel compelled to lift an item that is too heavy – get help instead.
  • Lift or lower an object if your arms are extended.
  • Continue to lift an item if you realize it’s too heavy.
  • Lift above your shoulders or below your knees.
Training for safe lifting can take time. NSC says that regular reinforcement of proper lifting techniques is critical, as people tend to revert back to previous lifting habits.
“Safe work practices must be enforced and any unapproved deviation must be corrected immediately,” the council states.

Eliminate Office worker ergonomics Hazards

Musculoskeletal disorders accounted for one-third of all injury or illness cases in the United States in 2011, according to Bureau of Labor Statistics data. Among office clerks, receptionists and administrative support workers, 4,050 MSD cases – including carpal tunnel syndrome and injuries to the neck, shoulder and back – required a median range of 11 to 16 days away from work to recover.


Image result for Office worker ergonomics

Chair adjustments

An employee should be shown how to adjust his or her chair, which initially should be adjusted to a position that is comfortable but does not strain the joints or muscles.

Keyboard and mouse

The computer keyboard and mouse should be comfortably within reach while allowing the forearms, hands and wrists to be roughly parallel to the floor at rest. Wrists in the neutral position should be supported by a wrist or palm support.

Monitor and documents

An employee should be able to easily adjust the height and location of the computer monitor, and reading materials should not require excessive neck movement to view.

Additional accessories

Equipment regularly used by the employee should not require awkward postures or repetitive forceful motions. Commonly used items should be placed within easy reach of the employee.
 A full ergonomics assessment also takes into account the following:
  • Lighting
  • Office temperature and humidity
  • Noise
  • Space for the worker to change position
Workers should be encouraged to report any workstation-related headaches, pain or discomfort to a supervisor.

How to report near misses

Near miss definition
An unplanned event that did not result in injury, illness or damage – but had the potential to do so.
Image result for near misses
An employee walks down the hall, stepping over an extension cord stretched across his path. He turns a corner and nearly collides with another worker. To avoid the collision, he steps to the side, spilling coffee onto the floor and inadvertently jostling a shelving unit, on which a tool placed close to the edge of the top shelf falls and hits the ground.
No one is hurt in this fictional scenario. However, the employees in it experience multiple near-miss situations – any one of which could have led to a serious injury.
Some people may be tempted to write off near misses as “no harm, no foul” situations. But safety professionals such as Jeff Ruebesam say employers who track near misses, determine how and why they occurred, and take corrective action can prevent similar – or more serious – incidents from happening in the future.
How Can Employers Encourage Workers to Participate in Near Miss Reporting?
• Create a policy and procedure that is communicated to all employees with the
backing of senior management.
• Promote a culture of reporting with the support and help of all managers and
supervisors.
• Educate employees on the reason why near miss reporting is a necessity, the
important role that they play, and the process for reporting.
• Ensure that the near miss reporting process is easy to understand and use.• Continue to communicate on the importance of near miss reporting encouraging
the participation of all employees.
• Use the near miss reporting as a leading indicator and report back to the organization on
the positive steps taken to improve workplace safety.
• Reinforce with employees that near miss reporting is non-punitive.• Consider incentives that encourage reporting and enhance the culture. (Incentives that
have the potential to discourage reporting must be avoided.)∙ An example of a good incentive is one that recognizes the participation of workers in the recognition and reporting of hazards. This activity helps to enhance a reporting culture, engage workers in meaningful safety activities, and continue a process of risk reduction. ∙ An example of a poor incentive is one that recognizes supervisory and management
performance based on outcome OSHA recordable rates. This type of incentive
has been shown to suppress reporting and can lead to punitive actions that further undermine safety efforts

Procedure to Protect Excavation Systems

EXCAVATION PROTECTION SYSTEMS:

There are three basic protective systems for an excavation and trenches:
a-                 Sloping and Benching Systems
b-                 Shoring Systems
c-                 Shields Systems
The protective systems shall have the capacity to resist without failure all loads that are intended or could reasonably be expected to be applied to or transmitted to the system.

SLOPING & BENCHING SYSTEMS:

Sloping Systems:
Maximum allowable slopes for excavations less than 20 feet (6.09 m) based on soil type and angle to the horizontal are as follows:
Soil Type
Height/Depth ratio
Slope Angle
Stable Rock
Vertical
90 deg.
Type A
¾ : 1
53 deg.
Type B
 1 : 1
45 deg.
Type C
1½ : 1
34 deg.


Benching Systems:
There are two types of benching, simple and multiple. The type of soil determines the horizontal to vertical ratio of the benched side.
As a general rule, the bottom vertical height of the trench must not exceed 4 feet (1.2 m) for the first bench. Subsequent benches may be up to a maximum of 5 feet (1.5 m) vertical in Type A soil and 4 feet (1.2 m) in Type B soil to a total trench depth of 20 feet (6.0 m).


Shoring Systems:
Shoring is the provision of a support system for trench faces used to prevent movement of soil, underground utilities, roadways, and foundations. Shoring is used when the location or depth of the cut makes sloping back to the maximum allowable slope impractical. Shoring systems consist of posts, wales, struts, and sheeting. There are two basic types of sharing, timber and aluminum hydraulic.

Hydraulic Shoring:


Hydraulic Shoring is a prefabricated strut and/or wale system manufactured of aluminum or steel. Hydraulic shoring provide a critical safety advantage over timber shoring because workers do not have to enter the trench to install or remove hydraulic shoring.
All shoring should be installed from top down and removed from bottom up.


Pneumatic Shoring:
Works in a manner similar to hydraulic shoring. The primary difference is that pneumatic shoring uses air pressure in place of hydraulic pressure. A disadvantage to the use of pneumatic shoring is that an air compressor must be on site.
Shielding Systems:
A- Trench Boxes:
Are different from shoring because, instead of shoring up or otherwise supporting the trench face, they are intended primarily to protect workers from cave-ins and similar incidents. The space between the outside of the trench box and the face of the trench should be as small as possible. The space between the trench boxes the excavation side are backfilled to prevent lateral movement of the box.
Combined Use:
Trench boxes are generally used in open areas, but they also may be used in combination with sloping and benching.
The box should extend at least 18 inch (0.45 m) above the surrounding area if there is sloping toward excavation. This can be accomplished by providing a benched areas adjacent to the box.
Spoil:


Temporary spoil must be placed no closer than 2 ft. (0.61 m) from the surface edge of the excavation

Different Types of SOIL CLASSIFICATION AND IDENTIFICATION

SOIL CLASSIFICATION AND IDENTIFICATION

The OSHA standards define soil classifications within the simplified soil classification systems, which consist of four categories:
a-             Stable Rock
b-            Type A Soil
c-             Type B Soil
d-            Type C Soil

Image result for types of soil in HSE
Stability is greatest in stable rock and decreases through type A and B to type C, which is the least stable.

Stable Rock: is defined as natural solid mineral matter that can be excavated with vertical sides and remain intact while exposed. (Example: granite or sandstone).

Type A Soil: are cohesive soils with unconfined compressive strength of 1.5 tons per square foot or greater. (Example: clay, silty clay, sandy clay, clay loam)

Type B Soil: are cohesive soils with an unconfined compressive strength greater than 0.5 tons per square foot but less than 1.5 (tsf)
(Example: angular gravel, silt, silt loam)

Type C Soil: are cohesive soils with an unconfined compressive strength of 0.5 tsf or less.(Example: gravel, sand and loamy sand, submerged soil, soil from which water is freely seeping.

SOIL TEST & IDENTIFICATIONS:

Many kinds of equipment and methods are used to determine the type of soil prevailing in an area, as described below:

Pocket Penetrometer: Penetrometers are direct - reading, spring - operated instruments used to determine the unconfined compressive strength of saturated cohesive soils. Once pushed into the soil, an indicator sleeve displays the reading.

Visual Test: If the excavated soil is in clumps, it is cohesive. If it breaks up easily, not staying in clumps, it is granular.

Thumb Penetration Test: The thumb penetration procedure involves an attempt to press the thumb firmly into the soil in question. If the thumb makes an indentation in the soil only with great difficulty, the soil is probably type A. If the thumb penetrates no further than the length of the thumb nail, it is probably Type B soil, and if the thumb penetrates the full length of the thumb it is type C.

Dry Strength Test: Try to crumble the sample in your hands with your fingers. If itcrumbles into grains, it is granular. Clay will not crumble into grains, only into smaller chunks.

Wet Manual Test: Wet your fingers and work the soil between them. Clay is a slick paste when wet, meaning it is cohesive. If the clump falls a part in grains, it is granular.

Top Most